How to Ground a Shielded Cable Properly
Time: 2025-06-22 13:58:49
Source: Henan Province Jianyun Cable Co., Ltd.
Overview of Shielded Cable Grounding
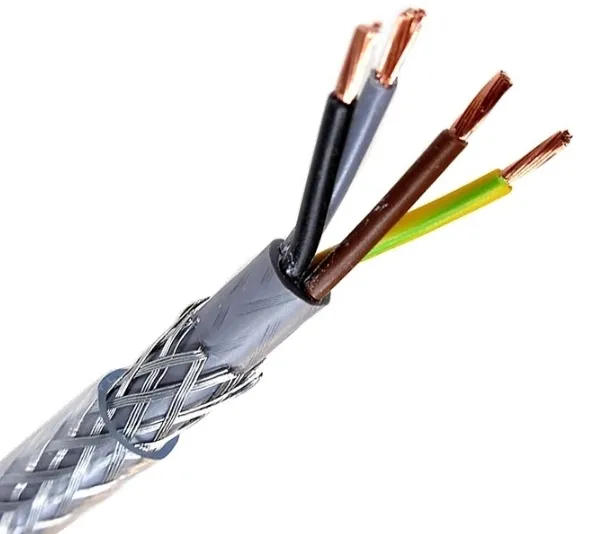
Grounding a shielded cable involves connecting the cable’s shield—a conductive layer (e.g., foil or braid)—to a grounding point to protect against electromagnetic interference (EMI) and ensure electrical safety. Shielded cables are commonly used in applications like telecommunications, industrial automation, and data centers to minimize signal interference. Proper grounding, as per standards like the National Electrical Code (NEC) or IEC 60364, is critical to maintain system performance, protect equipment, and ensure safety.
Importance of Proper Grounding
Effective grounding of shielded cables serves several purposes:
-
EMI Reduction: Grounds the shield to divert unwanted electrical noise, ensuring signal integrity for sensitive equipment.
-
Safety: Prevents stray currents or static buildup, reducing risks of electric shock or fire hazards.
-
Equipment Protection: Shields sensitive electronics from voltage spikes or surges induced by EMI.
-
Compliance: Meets regulatory requirements, such as NEC Article 250 or IEEE 1100, avoiding inspection failures.
-
System Reliability: Minimizes signal distortion or data loss in communication systems, enhancing performance.
Improper grounding can lead to EMI issues, equipment malfunctions, or safety violations, making adherence to best practices essential.
Equipment and Safety Requirements
Proper grounding requires specialized tools and strict safety measures:
-
Tools: Wire strippers, crimping tools, grounding clamps, multimeter, continuity tester, and grounding lugs or connectors.
-
Materials: Grounding conductors (e.g., copper wire), grounding busbars, or grounding rods compliant with NEC or IEC standards.
-
Personal Protective Equipment (PPE): Insulated gloves, safety glasses, and arc-rated clothing to protect against electrical hazards.
-
Lockout/Tagout Kit: To de-energize circuits before working on cables.
-
Documentation Tools: Notebook or digital device for recording grounding details.
Safety precautions:
-
Ensure only trained personnel perform grounding tasks.
-
De-energize circuits and verify with a multimeter before handling.
-
Follow local regulations and manufacturer guidelines for grounding procedures.
Step-by-Step Process for Grounding Shielded Cables
Step 1: Verify System and Cable Specifications
Understand the system and cable requirements to ensure proper grounding:
-
Review the cable’s datasheet for shielding type (e.g., foil, braid, or combination) and grounding recommendations.
-
Determine the grounding method (single-point or multi-point) based on application (e.g., single-point for low-frequency signals, multi-point for high-frequency).
-
Confirm the system’s grounding requirements per NEC Article 250 or IEC 60364, including ground point locations (e.g., busbar, chassis, or earth).
-
Check environmental factors, such as humidity or corrosive conditions, to select appropriate grounding materials.
Step 2: Prepare the Work Area and Ensure Safety
Create a safe and controlled environment:
-
De-energize the circuit using lockout/tagout procedures and verify zero voltage with a multimeter.
-
Ensure the work area is clean, dry, and free of conductive debris to prevent accidental shorts.
-
Wear appropriate PPE, including insulated gloves and safety glasses, to protect against electrical hazards.
-
Verify that grounding points (e.g., busbar, earth rod) are clean and properly installed per standards.
Step 3: Identify the Shield and Grounding Points
Locate the cable shield and grounding points:
-
Expose the shield by carefully stripping the outer jacket at the grounding point, ensuring no damage to the shield or conductors.
-
Identify the grounding point, such as a grounding busbar, equipment chassis, or earth ground, ensuring it is compliant with NEC or IEC standards.
-
For multi-conductor cables, determine whether the shield is continuous or segmented, as this affects grounding strategy.
-
Ensure the grounding point has low impedance to provide an effective path for EMI or fault currents.
Step 4: Connect the Shield to Ground
Establish a secure grounding connection:
-
Use a grounding pigtail (short conductor) or grounding clamp to connect the shield to the grounding point, ensuring a solid mechanical and electrical bond.
-
For foil shields, use a drain wire or pigtail to connect to the ground; for braided shields, use a grounding lug or clamp for secure contact.
-
Ground one end (single-point) for low-frequency applications (e.g., audio) to avoid ground loops, or both ends (multi-point) for high-frequency applications (e.g., RF or data cables) to maximize EMI shielding, per IEEE 1100.
-
Secure connections with crimping tools or screws, ensuring no loose contacts, and apply anti-corrosion compounds in harsh environments.
Step 5: Test the Grounding Connection
Verify the effectiveness of the grounding:
-
Use a continuity tester or multimeter to confirm a low-resistance path (<1 ohm) between the shield and the grounding point.
-
Check for ground loops in single-point grounding systems using a multimeter to ensure no unintended current paths exist.
-
Test the system for EMI performance if applicable, using an EMI meter to verify reduced interference.
-
Inspect connections visually for secure attachment and absence of corrosion or damage.
Step 6: Document and Maintain Grounding
Record and maintain the grounding setup:
-
Document the grounding method, connection points, test results, and cable specifications in a detailed report.
-
Label grounding points clearly to facilitate future maintenance or inspections.
-
Schedule periodic inspections (e.g., annually) to check for corrosion, loose connections, or environmental degradation, per NEC requirements.
-
Update grounding practices if system modifications or new standards are introduced.
Grounding Methods: Single-Point vs. Multi-Point
Choosing the appropriate grounding method depends on the application:
-
Single-Point Grounding: Ground the shield at one end only, typically used for low-frequency signals (e.g., audio, control systems) to prevent ground loops that cause noise or hum. Ideal for systems with long cable runs or sensitive analog signals.
-
Multi-Point Grounding: Ground the shield at multiple points or both ends, used for high-frequency signals (e.g., RF, Ethernet) to provide continuous EMI shielding. Common in data centers or industrial automation.
-
Hybrid Grounding: Combines single-point and multi-point methods for complex systems, using capacitors or resistors to control ground currents, per IEEE 1100 recommendations.
Consult system design specifications or an electrical engineer to select the optimal method.
Common Mistakes to Avoid
-
Grounding Both Ends Incorrectly: Grounding both ends in low-frequency systems can create ground loops, causing noise or signal distortion.
-
Poor Connections: Loose or corroded grounding connections increase resistance, reducing EMI protection and safety.
-
Using Incorrect Grounding Points: Connecting to non-compliant or high-impedance grounds compromises effectiveness.
-
Neglecting Testing: Failing to verify grounding with a multimeter can miss faulty connections, leading to EMI issues.
-
Ignoring Standards: Non-compliance with NEC or IEC guidelines risks inspection failures or safety hazards.
Summary Table: Grounding Process Steps
|
Step
|
Key Actions
|
Potential Risks if Skipped
|
|
Verify Specifications
|
Check cable datasheet, grounding method, standards
|
Incorrect grounding method, non-compliance
|
|
Prepare Work Area
|
De-energize, verify zero voltage, use PPE
|
Shock, accidental shorts
|
|
Identify Shield
|
Expose shield, select compliant grounding point
|
Damaged shield, ineffective grounding
|
|
Connect Shield
|
Use pigtail or clamp, select single- or multi-point
|
Ground loops, poor EMI protection
|
|
Test Connection
|
Verify <1 ohm resistance, check for ground loops
|
Faulty grounding, EMI issues
|
|
Document & Maintain
|
Record details, inspect periodically
|
Inspection failures, maintenance issues
|
Conclusion
Properly grounding a shielded cable is essential for reducing EMI, ensuring safety, and maintaining system reliability. By following a systematic process—verifying specifications, preparing the work area, connecting the shield correctly, testing the connection, and documenting results—installers can achieve effective grounding. Choosing the appropriate grounding method (single-point or multi-point) and adhering to standards like NEC or IEC ensures compliance and performance. Partnering with reputable suppliers like Jianyun Cable provides access to high-quality shielded cables with reliable grounding capabilities, supporting safe and efficient installations across various applications.

